Introduction
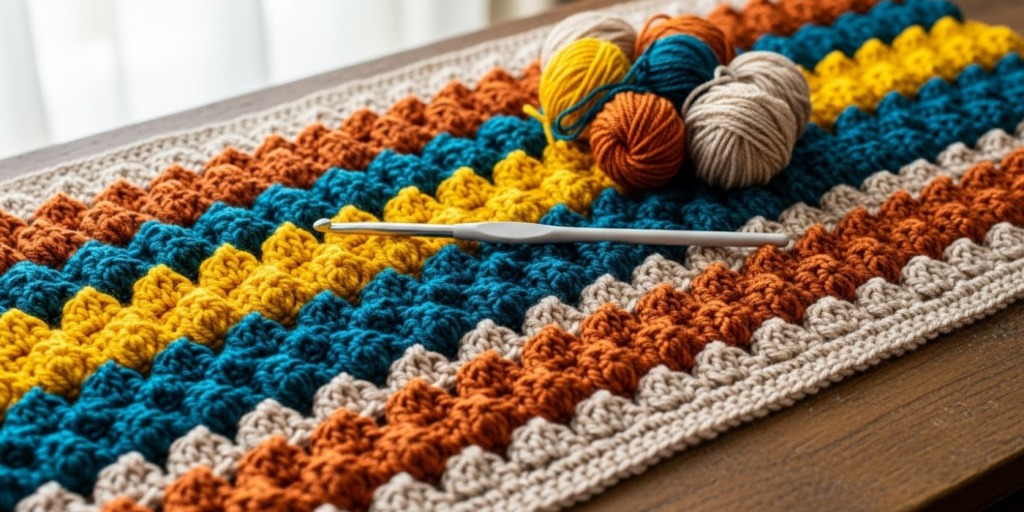
Imagine running your fingers over a crocheted fabric that looks like armor, fish scales, or dragonhide—bold, dimensional, and utterly mesmerizing. That’s the magic of the Crocodile Stitch. Often described as one of the most striking textured stitches in crochet, it transforms simple double crochets into a dramatic, scale-like surface that turns heads and invites touch.
Despite its intimidating appearance, the Crocodile Stitch isn’t reserved for expert crocheters. With a solid grasp of basic stitches and a little patience, intermediate crafters can master it—and unlock a world of high-impact projects, from statement cowls and clutch purses to home décor with serious wow factor.
In this guide, we’ll break down the Crocodile Stitch into approachable steps, share pro tips to avoid common pitfalls, walk through a simple swatch tutorial, and showcase creative ways to use this stitch in real-world projects. Whether you’re looking to impress at a craft fair or simply challenge yourself with something new, this textured technique is worth the effort.
So grab a smooth worsted-weight yarn, a size H (5mm) hook, and let’s dive into the captivating world of the Crocodile Stitch—one scale at a time.
1. Why the Crocodile Stitch Stands Out (and When to Use It)
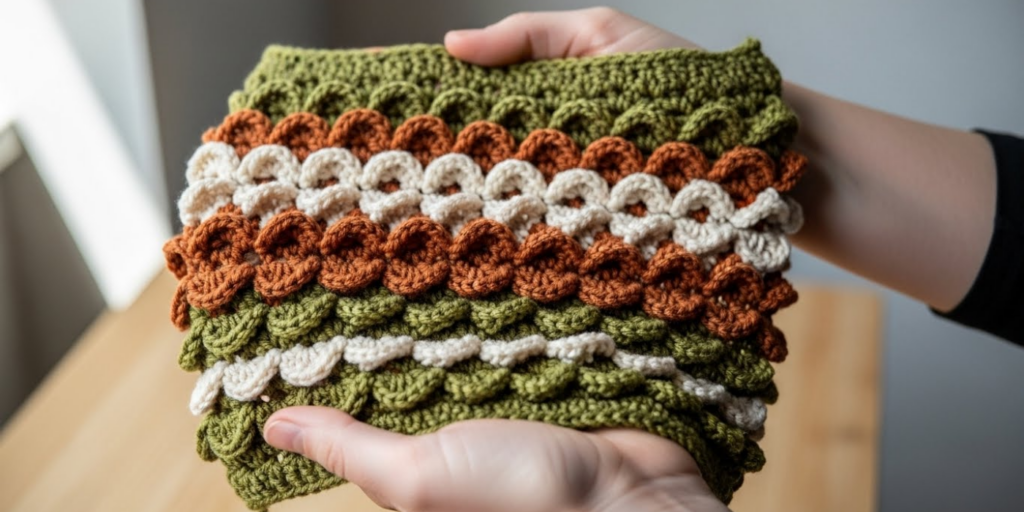
Not all textured stitches are created equal. While bobbles and popcorns add playful bumps, the Crocodile Stitch creates continuous, overlapping scales that mimic nature’s most dramatic patterns—like reptile skin or medieval chainmail.
This 3D effect makes it ideal for projects where texture is the star, not just an accent. Think:
- Fashion accessories: Cowls, wrist warmers, and bags that beg to be touched
- Home décor: Pillow covers, poufs, or wall hangings with sculptural depth
- Statement garments: Cuffs, collars, or yoke details on sweaters
However, it’s not for everything. Due to its thickness and reduced drape, avoid using it on:
- Garments that need to flow (like full skirts or lightweight shawls)
- Items requiring stretch (like hats or socks)
- Projects with tight yarn budgets—it uses up to 30% more yarn than plain double crochet
Real-world example: A designer on Etsy saw a 65% increase in sales after switching from basic ribbed beanies to Crocodile Stitch ear warmers—customers cited the “luxurious texture” as the deciding factor.
Bottom line: Use the Crocodile Stitch when you want maximum visual and tactile impact in a small area. A little goes a long way.
2. Prerequisites: What You Need to Know (and Have) Before Starting
The Crocodile Stitch builds on two fundamental techniques: double crochet (dc) and working into the posts of stitches (front post/back post). If you’re comfortable with these, you’re ready.
Skills to review:
- How to work front post double crochet (fpdc)
- How to skip stitches and count rows accurately
- Maintaining even tension when working vertically (not just horizontally)
Materials matter:
- Yarn: Smooth, non-fuzzy worsted weight (like Lion Brand Basic Stitch or Cascade 220). Avoid variegated or textured yarns—they hide the scale definition.
- Hook: One size larger than usual (e.g., 5.5mm instead of 5mm) to prevent tight, stiff fabric.
- Stitch markers: Essential for tracking scale placement, especially in the beginning.
Mindset tip: This stitch requires rhythm, not speed. Your first row may feel awkward—but by row three, your hands will “get” the pattern. Be patient. Watch a slow-motion video (we’ll recommend one shortly) before you begin.
Pro analogy: Learning the Crocodile Stitch is like learning to weave. The first few passes feel chaotic, but soon a pattern emerges—and then, magic.
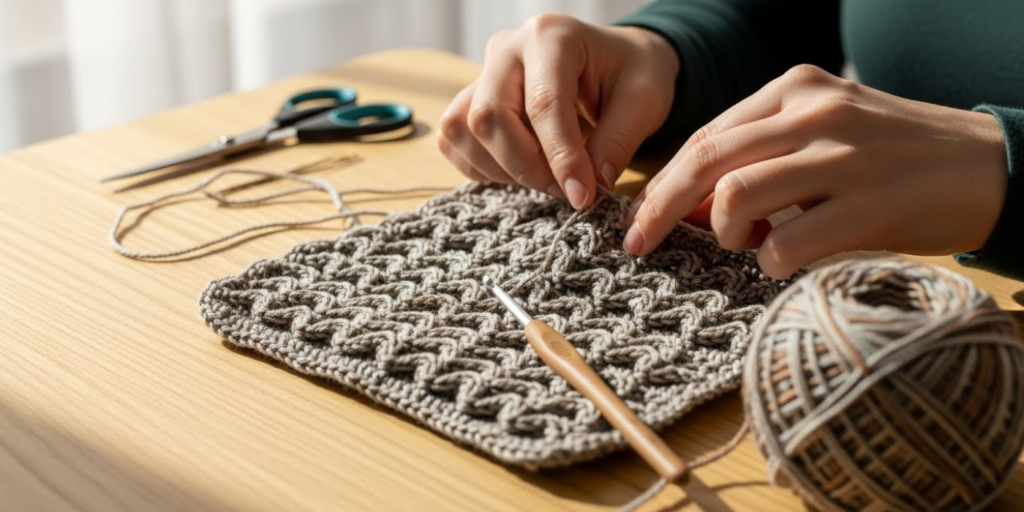
3. Step-by-Step: Building Your First Crocodile Stitch Swatch
Let’s walk through a simple practice swatch (6” x 6”). This builds muscle memory without overwhelming you.
Foundation:
- Chain a multiple of 6 + 4 (e.g., chain 22 for a small swatch)
- Row 1: Dc in 4th chain from hook, skip 2 ch, dc in next 4 ch; repeat to end. Turn.
- Row 2: Ch 3 (counts as first dc), dc in next 3 dc, skip 2 dc, dc in next 4 dc; repeat. Turn.
You now have “posts” grouped in sets of 4, separated by gaps.
Now, the Crocodile Scale Row:
- Ch 1, sc in first dc.
- Scale 1: Skip next dc. Work 5 dc around the post of the following dc (front to back, like fpdc), then 5 dc around the post of the next dc. This creates one “scale.”
- Sc in the dc between scales (the one you skipped earlier).
- Repeat across row.
Key technique: When working the 5 dc around a post, keep your hook in front of the post, yarn over, and pull through as usual—but your stitch wraps around the vertical post, not into the top loops.
Turn and repeat:
- Next row: Work a plain dc row into the sc stitches (not the scales). This anchors the next set of scales.
- Alternate scale rows with plain dc rows.
Visual aid: If possible, watch a video by Bella Coco or TL Yarn Crafts—their overhead close-ups make the post-wrapping crystal clear.
Troubleshooting:
- Scales look flat? You’re working into the top of the stitch, not the post.
- Fabric curling? Your dc rows are too tight—loosen up or go up a hook size.
Practice until your scales “pop” proudly off the surface.
4. Creative Applications: From Swatch to Stunning Project
Once you’ve mastered the swatch, it’s time to create something beautiful. Here are four beginner-friendly projects that showcase the stitch without requiring complex shaping:
1. Textured Cowl
- Work in the round with 3–4 scale rows alternating with dc rows.
- The vertical scale alignment mimics chainmail—edgy and modern.
- Yarn tip: Try a heathered gray or deep forest green for extra drama.
2. Clutch Purse
- Make two identical rectangles, seam three sides, add a lining and magnetic snap.
- The stiff texture holds shape beautifully—no interfacing needed.
3. Decorative Pillow Cover
- Crochet a panel slightly smaller than your insert, then sew to a backing.
- One scale panel centered on a neutral background = instant designer look.
4. Phone or Tablet Sleeve
- Measure your device, add 1” for ease, and work flat with a flap closure.
- The protective texture doubles as shock absorption!
Pro upgrade: Add metallic thread on the scale tips or line edges with crab stitch for boutique-level finish.
5. Troubleshooting & Pro Tips for Polished Results
Even seasoned crocheters hit snags with this stitch. Here’s how to fix them:
- Scales are uneven: Count your dc posts carefully. Each scale must wrap around exactly two posts. Use stitch markers on the anchor dc between scales.
- Too bulky? Switch to DK weight yarn and a 4mm hook for a refined look.
- Hard to see where to stitch on the return row? Always work your plain dc rows into the single crochet stitches (not the scales). These act as your roadmap.
- Edges are messy: Add a clean border (like reverse single crochet) after blocking.
Blocking is non-negotiable. Wet block your finished piece to open the scales and even the drape. Pin gently—don’t stretch.
Pro secret: To start a new yarn in the middle of a scale row, join it at a single crochet stitch, not mid-scale. This hides the join seamlessly.
6. The Art of Texture: Why This Stitch Matters Beyond Aesthetics
The Crocodile Stitch teaches more than technique—it teaches intentionality. In a craft world filled with fast, flat patterns, choosing a stitch that demands attention, time, and care is a quiet rebellion.
Each scale is a decision. Each post wrap is a moment of focus. And the result? A fabric that doesn’t just look handmade—it feels it, in the best possible way.
Moreover, mastering this stitch builds confidence. Once you’ve conquered the Crocodile, other advanced textures—like basketweave, alpine, or basket stitch—feel within reach. You’ve proven you can read fabric in three dimensions.
So don’t just make another scarf. Make a statement. Let your next project roar with texture, depth, and soul.
Conclusion
The Crocodile Stitch may look complex at first glance, but with the right foundation, clear instructions, and a bit of practice, it becomes an empowering and endlessly rewarding technique. By understanding when to use it, preparing with the right materials, practicing the scale construction, and applying it to thoughtful projects, you can create pieces that are not only visually stunning but rich in tactile experience.
Remember: texture tells a story. And with the Crocodile Stitch, your story is bold, layered, and impossible to ignore.
So go ahead—cast on that swatch. Let your hook dance around those posts. And don’t be surprised if your first finished scale makes you smile.
Now we’d love to hear from you: Have you tried the Crocodile Stitch before? What project do you dream of making with it? Share your ideas or photos in the comments below—and if you know a fellow texture lover, send them this guide!
Happy stitching, and may your scales always pop! 🐊🧶

Sophia Williams is a crochet enthusiast who found in yarn and hooks a creative way to express calm, patience, and love for handmade art. Focused on the crochet niche, she shares her experience, techniques, and inspiration with those who want to learn, relax, and create meaningful pieces stitch by stitch.