Introduction
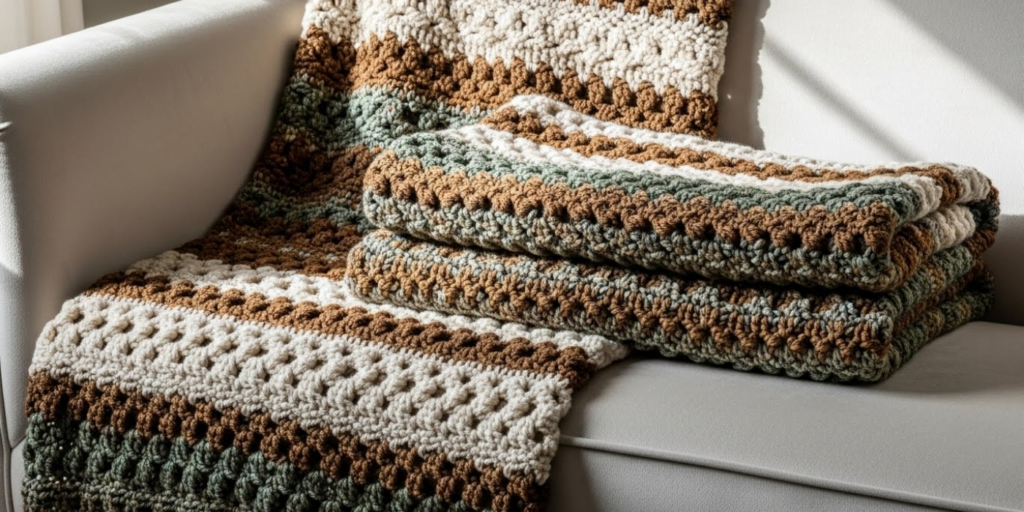
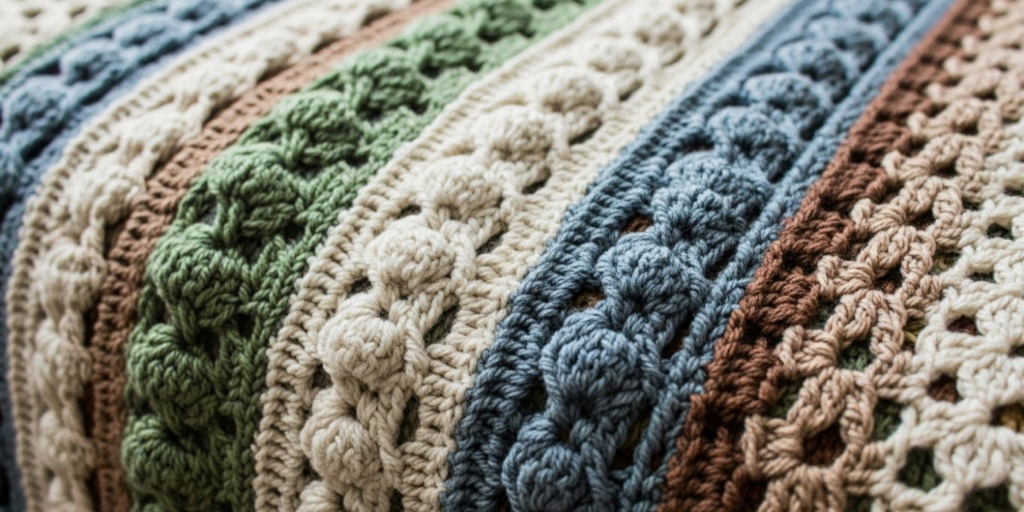
There’s something deeply satisfying about running your fingers over a richly textured crochet blanket—the ridges of cables, the soft peaks of bobbles, the rhythmic waves of basketweave stitches. For advanced crocheters, texture isn’t just decoration; it’s a language of depth, dimension, and artistry.
While beginner blankets often rely on simple repeats, advanced textured blankets challenge your skills, reward your patience, and result in heirloom-quality pieces that drape beautifully and tell a story with every stitch. Whether you’re crafting a cozy throw for your sofa or a luxurious gift for a loved one, these patterns offer the perfect blend of technique and tactile beauty.
In this guide, we’ll explore four sophisticated textured blanket patterns that go beyond the basics: a cable-knit inspired design, a 3D wave ripple, a sculptural basketweave, and a reversible mosaic texture. You’ll also learn yarn selection tips, blocking techniques, and how to customize size without losing stitch integrity.
If you’re ready to move past basic stitches and create something truly magnificent—let’s dive in.
1. Why Texture Transforms a Blanket from Ordinary to Extraordinary
Texture does more than look beautiful—it enhances function and feeling.
A smooth blanket may be soft, but a textured one traps warmth, offers visual interest from every angle, and ages gracefully (hiding minor wear better than flat fabric). For advanced makers, working with texture also sharpens key skills:
- Tension control (critical for consistent relief)
- Stitch counting in complex repeats
- Reading fabric (knowing where you are without counting every row)
Real-world impact: A hand-textured blanket becomes a focal point in any room—draped over a chair, folded at the foot of a bed, or wrapped around someone on a chilly evening. It says, “This was made with time, care, and mastery.”
Moreover, texture allows for reversible designs, intricate colorwork without tapestry crochet, and architectural structure that holds its shape after years of use.
2. Choosing the Right Yarn and Hook for Maximum Impact
Not all yarns showcase texture equally. The wrong choice can flatten your cables or mute your bobbles.
Best yarn types for textured blankets:
- Worsted or bulky wool or wool-blend (e.g., Cascade 220, Malabrigo Worsted): Wool’s natural elasticity helps stitches “pop.”
- Cotton or cotton-blend (e.g., Lion Brand Comfy Cotton Blend): Crisp stitch definition, ideal for geometric textures like basketweave.
- Avoid: Superwash-only yarns (they can be too slippery) or very fuzzy yarns (they obscure stitch detail).
Hook selection:
- Use a hook 1–2 sizes smaller than recommended on the label. Tighter tension = more pronounced texture.
- Example: For worsted wool, try an I-9 (5.5mm) instead of a K-10.5 (6.5mm).
Color strategy:
- Solid or semi-solid colors highlight texture best. Variegated yarns can blur stitch definition.
- Tonal palettes (e.g., cream → oatmeal → taupe) add subtle depth without distraction.
Pro tip: Swatch your pattern in your chosen yarn—texture can look drastically different on a 4″ swatch vs. a full blanket.
3. Pattern #1: The Cable-Knit Crochet Throw
This design mimics traditional knitting cables using front post stitches—but with the drape and speed of crochet.
Skill level: Advanced
Finished size: 50″ x 60″ (adjustable)
Stitches used: Chain (ch), double crochet (dc), front post double crochet (fpdc), back post double crochet (bpdc)
Key technique: Post stitch crossing
- Every 8 rows, you’ll “cross” fpdc groups to create the cable twist.
- Example row: Fpdc around post of 3rd st from previous cable, then fpdc around 1st, 2nd, and 4th sts—this creates the illusion of stitches moving over each other.
Why it’s special: The cables run vertically, giving the blanket a tailored, sophisticated look—perfect for modern farmhouse or minimalist interiors.
Yarn recommendation: 1,800 yards of worsted wool in a neutral shade like heather gray or camel.
4. Pattern #2: 3D Wave Ripple Blanket
Forget the flat ripples of traditional chevron blankets—this version uses raised wave clusters that undulate across the surface like ocean swells.
Skill level: Advanced
Technique: Cluster stitches with strategic increases/decreases
How it works:
- Each wave is formed by a series of 5-dc clusters worked into the same stitch, then spaced with single crochet “valleys.”
- Rows alternate direction, creating a true 3D ripple that catches light beautifully.
Customization:
- Adjust wave height by changing cluster size (3-dc for subtle, 7-dc for dramatic).
- Use two contrasting colors—one for waves, one for valleys—for graphic impact.
Perfect for: Adding movement to a neutral living room or creating a calming, organic feel in a bedroom.
5. Pattern #3: Sculptural Basketweave Blanket
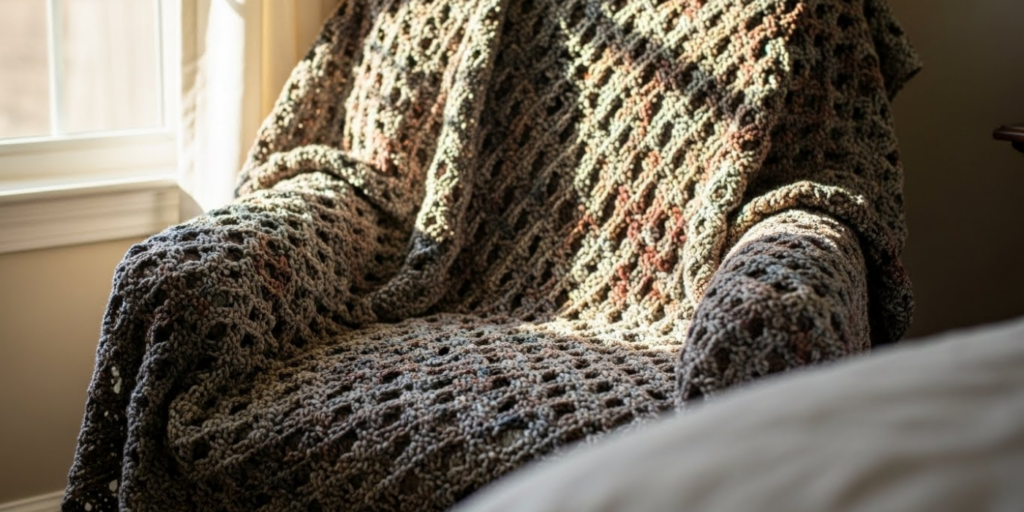
This reversible pattern uses alternating blocks of front and back post stitches to mimic woven fabric—with incredible depth and structure.
Skill level: Intermediate-Advanced
Stitch repeat: 12-row sequence that builds interlocking “strips”
How to execute:
- Rows 1–6: Work vertical strips in fpdc
- Rows 7–12: Work horizontal strips in bpdc over the first set
- The result? A true woven illusion that’s identical on both sides
Benefits:
- Reversible—no “wrong side”
- Highly durable—ideal for high-use throws
- Thermally efficient—the air pockets trap warmth
Yarn tip: Use a tightly spun cotton for sharp definition, or a wool blend for cozy drape.
6. Pattern #4: Reversible Mosaic Texture Blanket
Inspired by mosaic tilework, this design uses post stitches and strategic spacing to create geometric patterns that look identical on both sides—no color changes needed.
Skill level: Advanced
Technique: Alternating blocks of fpdc and regular dc to form “tiles”
Pattern structure:
- A 16-stitch repeat creates 4×4 “tiles”
- Every 4 rows, the tile orientation shifts, forming a subtle checkerboard in relief
Why it’s stunning: From a distance, it looks like a solid textured blanket. Up close, the mosaic pattern emerges—rewarding the observant eye.
Design tip: Use a heathered yarn to enhance the shadow play between raised and flat areas.
7. Finishing Like a Pro: Blocking and Edging
Advanced texture demands advanced finishing.
Blocking is non-negotiable:
- Wet-block wool blankets by soaking, gently squeezing (never wringing), then pinning to shape on a blocking mat.
- Steam-block cotton lightly with an iron held above the fabric (don’t touch!).
Edging options:
- Simple single crochet border: Clean and modern
- Picot or shell edging: Adds femininity without overwhelming texture
- No border: Let the raw texture speak for itself—ideal for minimalist designs
Critical step: Weave in all ends before blocking—they’ll felt into place and stay secure.
Final Thoughts: Texture as Legacy
A textured blanket isn’t just a project—it’s a legacy. The hours you spend working cables, waves, and weaves become part of its soul. And decades from now, when someone wraps themselves in it, they’ll feel not just warmth, but the quiet presence of your hands and heart in every ridge and valley.
Conclusion
For advanced crocheters, textured blankets are the ultimate canvas to showcase skill, patience, and artistry. Whether you choose the architectural precision of basketweave, the fluid grace of 3D waves, or the timeless elegance of crochet cables, these patterns offer depth, beauty, and function in every stitch.
Remember: the goal isn’t perfection—it’s presence. Each bobble, post stitch, and cluster is a testament to your growth as a maker.
So select your yarn, clear your space, and begin. Your masterpiece is waiting to be stitched—one textured row at a time.
Now we’d love to hear from you: Which textured pattern speaks to you most? Do you have a favorite yarn for showcasing stitch definition? Share your projects, tips, or dream blanket ideas in the comments below—we’re all weaving inspiration together!

Sophia Williams is a crochet enthusiast who found in yarn and hooks a creative way to express calm, patience, and love for handmade art. Focused on the crochet niche, she shares her experience, techniques, and inspiration with those who want to learn, relax, and create meaningful pieces stitch by stitch.